Blog by Sumana Harihareswara, Changeset founder
Dyeing My Hair
I recently bleached and dyed my hair at home, and I really enjoyed the end result. A few people expressed curiosity, and I will probably want to refer to the process later, so here's a writeup.
My factors:
- I'm of South Asian descent and my hair is darkest black. So I needed to bleach it before adding color.
- The quantity of hair I wanted to color was pretty limited: a fauxhawk-type stripe from forehead to neck, maybe two inches wide, each strand 1-2 inches long. So I didn't need the whole bleach kit. I figured I needed maybe a quarter of it.
- I chose a few different colors of hair dye thinking I'd create a cool swirly blendy pattern. It basically worked!
- I thought I'd be able to do all of this myself, but as my spatial skills and dexterity weren't good enough, Leonard helped me with the top and back of my head. I don't know what additional stuff you might need to do this solo.
On to the hair bleaching & dyeing process!
Objects needed
- bleach kit (Arctic Fox's "Bleach, Please!"; I chose this because people on hair care subreddits recommended it)
- hair dye(s) (I picked cheapo clearance dyes from the beauty supply store: Color Jamz brand Tripped Up Turquoise, Designer Denim High Pigment, and Pastel Chic In Pink)
- kitchen scale for weighing out a portion of the bleach kit
- nitrile or food-handling gloves
- timer
- mirror(s)
- ratty towel
- showercap
- ratty clothes that are ok to get bleach and dye on
- electric fan
- plastic bowl & brush for applying bleach/dye (bought these for like $8 total at a local beauty supply store; reusable)
- maybe a square foot of aluminum foil
- Vaseline
- book to read while waiting
Phase 0: Testing
Bleaching! It's dangerous!
Bleach is dangerous and you should heed the warnings on the package. Do that skin allergy patch test before bleaching your hair - the Bleach, Please instructions explain in detail, but basically, you make a wee bit of bleach mix, apply it to a patch of your skin, and leave it there for 48 hours to test for a reaction.
- bleach sensitivity test
- A few days in advance I ran the bleach sensitivity test on my skin and had an unpleasant mild tingle for like 40 minutes but then no ill effects. So I figured I was good to go. (The bleach kit also suggested doing a strand test in advance, to check whether the color would be good enough, but I didn't care about that and figured if I hated the end result I'd just cut it all off.
- I saw that the dye bottles also suggested doing a patch test and a strand test, but I decided to skip those, and perhaps got lucky.)
- leave hair unshampooed & unbrushed for like 2 days (to protect the scalp; brushing hair can introduce tiny tears in the skin of the scalp, and bleach on those is very ouch)
- a friend advised: like an hour before bleaching, work in some coconut oil, which protects the hair but doesn't interfere with bleaching; I didn't have any around, so I substituted olive oil, then washed it out
Phase I: Bleaching
- prep objects (bleach kit, fan, etc.) in bathroom
- open bathroom window and turn on fan
- change into ratty clothes
- use Vaseline to protect hairline -- in my case, at the edge of the forehead and at the nape of my neck
- weigh like 1/4 of the kit into the bowl
- put gloves on
- open kit; mix developer & bleach together
- apply bleach mix, starting with ends, working down to roots - stay 1/8 inch away from roots, to avoid scalp irritation (I probably did not manage this)
- finish applying to whole fauxhawk
- start 45-min timer
- cover head with showercap
- rinse out bowl/brush, take gloves off
- wait 45 minutes
- rinse with lukewarm water (both my head and the showercap, since I'll want to reuse the showercap)
- wash head with shampoo
Here's how I looked after the bleach step!
Phase 2: Conditioning
- massage hair and scalp with LOTS of conditioner (like, two handfuls), cover with showercap
- set a timer for 1 hour
- use this time to cut aluminum foil into strips
- wait 1 hour
- rinse hair (I forget whether this was lukewarm water)
Phase 3: Dyeing
- put gloves on
- make palette of dyes in bowl -- squirt some big pools of each color in there
- [at this step I should have once more applied Vaseline at the borders of my forehead and neck to protect my skin from getting dye on it]
- use brush to apply dye to hair -- generally try to use more green on the left and blue on the right, and if there are clumps I want to keep particularly distinct (like bits of pink someplace on the top), apply dye and then wrap them in aluminum foil strips (this was very fiddly and I think I need to watch videos to get it right)
- cover with showercap
- microwave ratty towel and cover showercap with warm ratty towel
- take gloves off
- set timer for 5 hours
- the bottle said to leave the dye on for 20-30 minutes; a friend advised me to leave the dye on for about ten times that, so, 5-6 hours, or even overnight
- wait 5 hours
- rinse with cold water till water runs clear; I did this in the stainless steel kitchen sink
- rub dry with ratty towel
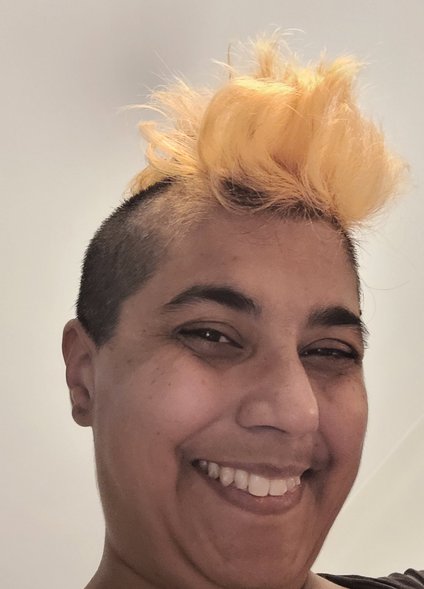
me smiling with a shock of very yellow hair at the top of my head and shaved sides
And here's how I looked immediately after that last step. One side is indeed more blue and then it shifts into green on the other side. The top of the scalp includes a few pink bits which faded a lot faster than the blues and greens, but since the underlying color was now the bleached yellow, that worked fine as part of the blue-green-yellow spectrum.
From here on out I put a ratty towel on my pillow to absorb bits of dye so they wouldn't stain the pillowcase. And indeed it's tinged with blue now.
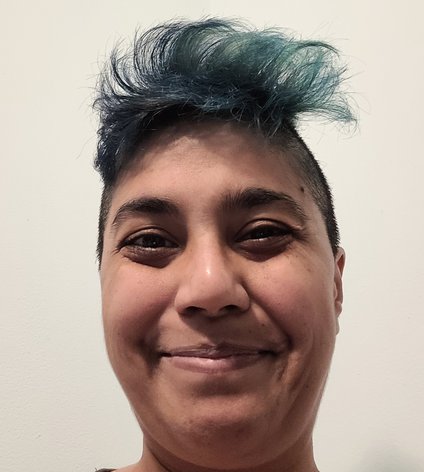
me, smiling, with a ruff of dark blue-green hair at the top and shaved sides, in indoor light
I liked it a lot immediately afterwards but I liked it even more some weeks later, as the bits near my face lightened a bit and the blues went more green. (Washing the hair infrequently, with cold water, and using lots of conditioner, helped preserve color and keep the hair soft.)
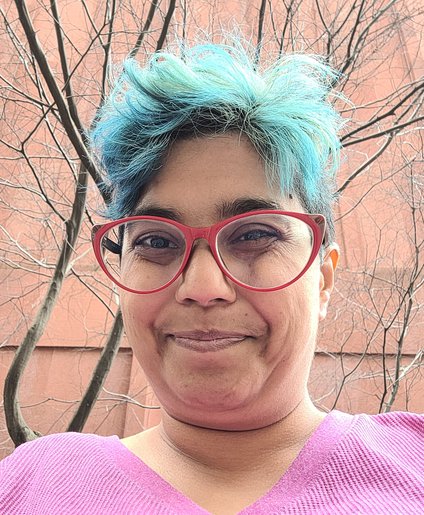
me, outdoors in diffuse sunlight, with turquoise hair with dark roots, one month after bleaching and dyeing
Many years ago I got my hair bleached and dyed at a salon; it was so cool (and cheap) to do it at home! (Like $40 total, including bleach, dyes, and reusable bowl and brush, instead of like $200+ at a salon.) And safer for COVID risk, too!
While researching this, I read a lot on the Arctic Fox knowledge base: general instructions, general bleach safety tips, what bleach does, how long to leave the bleach in, using heat, the scalp, bleaching tips, re-bleaching, foils and showercap, and dyeing after bleaching. Thanks to Leonard for assistance, and to various advice-givers on the Internet for confirmations and tips that I was on the right track. And I got specific tips from several friends – thanks, Liz, Denise, and Yuvi!
Comments
Brendan
29 Mar 2023, 14:00 p.m.
Mirabai
29 Mar 2023, 14:40 p.m.
Looks amazing!!
Emma H
https://emmas.site/
29 Mar 2023, 16:59 p.m.
I love that color and all the energy you are bringing to the 'after' photo!
Catherine Devlin
27 Apr 2023, 17:43 p.m.
I was going to tell you at PyCon that I’d been reading your blog, but I guess the fact that I didn’t recognize your hair at first shows I hadn’t been reading faithfully enough!

The results look amazing! It's a delight to see your face.